In This
tutorial we will discuss different type of attributes those are used in Asp.net mvc for display purpose.
As we know
that these display attribute store in the “using System.ComponentModel.DataAnnotations;”
NameSpace.
Step(1):- Go to Sql Server management system and execute
following script.
create database
MVCVariousAttribute
use
MVCVariousAttribute
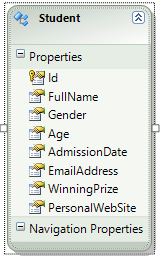
Create table Student
(
Id int primary key identity,
FullName nvarchar(100),
Gender nvarchar(10),
Age int,
AdmissionDate DateTime,
EmailAddress nvarchar(100),
WinningPrize int,
PersonalWebSite nvarchar(100)
)
Insert into Student values
('Munesh
Sharma', 'Male', 25, '2005-05-05 16:53:36.975', 'Munesh@gmail.com', 45000, 'http://dotnet-munesh.blogspot.in/')
Insert into Student values
('Rahul Sharma', NULL, 30, '2006-06-06 17:42:25.865', 'Rahul@gmail.com', 35000, 'http://dotnet-munesh.blogspot.in/')
|
Step(2):-
Go to Visual studio and add a new project -> Select “Asp.Net MVC4 Web Application” and give the name for this
,In my case it is “MVCApplicationWithVariousAttribute”
-> Select a Project template as Empty and View engine is “Razor”, Then Click OK
Step(3):- Add “EntityFramework dll” to reference folder in your project if you don’t
have then install it through nugget package manager for more go this Go here.
Step(4):- Right
click on Model folder and add “Ado.net entity Data Model” and give the name it
as “StudentDataModel”, Then click on Add
Step(5): . When
You will click Add button here you will see another window for
“EntityData modal Wizard” from there you select “Generate From DataBase”,
And Click Next.
Give the
connection name and select your database then click on next
Step(6) . In
this screen select your Database Tables and give Modal Name then click FINISH
Button.
When you will click on finish button it will create Student
Entity.
Step(7):-
Now at this position go to controller folder -> right click on this folder and
add a controller with the name “HomeController”, It will create a home
controller , write the following code on this page.
Here we
will use only Detail action method
using System;
using System.Collections.Generic;
using System.Linq;
using System.Web;
using System.Web.Mvc;
using
MVCApplicationWithVariousAttribute.Models;
namespace
MVCApplicationWithVariousAttribute.Controllers
{
public class HomeController
: Controller
{
public ActionResult
Details(int id)
{
MVCVariousAttributeEntities
_context = new MVCVariousAttributeEntities();
Student
_studentDetail =
_context.Students.Where(c => c.Id == id).SingleOrDefault();
return
View(_studentDetail);
}
//
// GET:
/Home/Create
public
ActionResult Create()
{
return
View();
}
//
// POST:
/Home/Create
[HttpPost]
public
ActionResult Create(FormCollection collection)
{
try
{
//
TODO: Add insert logic here
return
RedirectToAction("Index");
}
catch
{
return
View();
}
}
//
// GET:
/Home/Edit/5
public
ActionResult Edit(int
id)
{
return
View();
}
//
// POST:
/Home/Edit/5
[HttpPost]
public
ActionResult Edit(int
id, FormCollection collection)
{
try
{
//
TODO: Add update logic here
return
RedirectToAction("Index");
}
catch
{
return
View();
}
}
//
// GET:
/Home/Delete/5
public
ActionResult Delete(int id)
{
return
View();
}
//
// POST:
/Home/Delete/5
[HttpPost]
public
ActionResult Delete(int id, FormCollection
collection)
{
try
{
//
TODO: Add delete logic here
return
RedirectToAction("Index");
}
catch
{
return
View();
}
}
}
}
|
Step(8):-
Next step is that add a view for detail action method so right click on this
method -> add view -> Scaffold template as Detail
It will
generate a code for Detail view, Now run your application and redirect to the
following URL
http://localhost/MVCApplicationWithVariousAttribute/Home/Details/1
|
It is With
Home controller then Detail action method with ID “1”
When we see
this output , we see that it is not pretty good means there is no gap in
FullName other things so for that we will use attribute.
Step(9):- When we create a application using
entityFramework we add a EntityDataModel then we gives connection and select
tables that time it create a class in model (Designer class).
When we go to this class we see that it’s a partial class,
And this is a auto generated class .This contain all the properties (In region “#region Primitive Properties) , These properties name matches with the Table column Name.
We can change this header name by
changing the properties name in Student class which is auto generated class.
If we change in auto generated
student class is not good because due this we can loss all the changes , So we
have to customization in different class.
This auto generated class is a
partial class so we can create a another student partial class and we can make
changes there.
So in modal folder add a class and
give the name as “Student.cs” and write the following code in this class
using System;
using System.Collections.Generic;
using System.Linq;
using System.Web;
using System.ComponentModel.DataAnnotations;
using System.ComponentModel;
namespace MVCApplicationWithVariousAttribute.Models
{
[MetadataType(typeof(StudentMetaData))]
public partial class Student
{
}
public class StudentMetaData
{
//If you
want "FullName" to be displayed as "Full Name",
//use
DisplayAttribute or DisplayName attribute.
//[DisplayAttribute(Name="Full
Name")]
//[Display(Name
= "Full Name")]
[DisplayName("Full Name")]
public
string FullName { get;
set; }
//To get
only the date part in a datetime data type
//[DisplayFormat(DataFormatString
= "{0:d}")]
//[DisplayFormatAttribute(DataFormatString="{0:d}")]
//To get
time in 24 hour notation
//[DisplayFormat(DataFormatString
= "{0:dd/MM/yyyy HH:mm:ss}")]
//To get
time in 12 hour notation with AM PM
[DisplayFormat(DataFormatString
= "{0:dd/MM/yyyy hh:mm:ss tt}")]
public
DateTime? AdmissionDate { get; set; }
// If
gender is NULL, "Gender not specified" text will be displayed.
[DisplayFormat(NullDisplayText
= "Gender not specified")]
public
string Gender { get;
set; }
//If you
don't want to display a column use ScaffoldColumn attribute.
//This only
works when you use @Html.DisplayForModel() helper
[ScaffoldColumn(false)]
public int? WinningPrize { get;
set; }
}
}
|
Run you application with these changes
DataType and Display column attribute
DataType attribute
public class StudentMetaData
{
// Display mail to hyperlink
[DataType(DataType.EmailAddress)]
public string EmailAddress { get;
set; }
// Display currency symbol. For country
specific currency, set
// culture
using globalization element in web.config.
// For Great
Britain Pound symbol
//
<globalization culture="en-gb"/>
[DataType(DataType.Currency)]
public int? WinningPrize{ get; set; }
// Generate a
hyperlink
[DataType(DataType.Url)]
public string PersonalWebSite { get; set; }
// Display only Time Part
//
[DataType(DataType.Time)]
// Display
only Date Part
[DataType(DataType.Date)]
public DateTime? AdmissionDate { get; set; }
}
|
DisplayColumn attribute
It is used when a class has complex type properties and you
want to get one properties from these complex object for display. We will take
a example
Go to model folder and add a class with the name is Collage.cs
and in this class write the following code
public class Collage
{
public Student CollageDirector
{
get
{
MVCVariousAttributeEntities db = new MVCVariousAttributeEntities ();
return db.Student.Single(x => x.Id == 1);
}
}
}
|
This CollageDirector will return the Student object if we
want to show full name then change the Student.cs partial class for full name
[MetadataType(typeof(StudentMetaData))]
[DisplayColumn("FullName")]
public partial class Student
{
}
|
Now customize the Detail action method in Home controller
public ActionResult Details(int id)
{
Collage info = new Collage();
return View(info);
}
|
View will be like following code
@model MVCApplicationWithVariousAttribute.Models.Collage
@{
ViewBag.Title
= "Details";
}
@Html.DisplayTextFor(x => x.CollageDirector)
|
Now run your application you will see only full name.